Intercostal Catheters and Needle Thoracocentesis
Disclaimer
These guidelines have been produced to guide clinical decision making for the medical, nursing and allied health staff of Perth Children’s Hospital. They are not strict protocols, and they do not replace the judgement of a senior clinician. Clinical common-sense should be applied at all times. These clinical guidelines should never be relied on as a substitute for proper assessment with respect to the particular circumstances of each case and the needs of each patient. Clinicians should also consider the local skill level available and their local area policies before following any guideline.
Read the full CAHS clinical disclaimer
|
Aim
To guide Emergency Department (ED) staff in the use of intercostal catheters and needle thoracocentesis.
Needle Thoracocentesis1
- Needle thoracocentesis provides rapid emergency decompression of a tension pneumothorax
- It is a temporary life-saving procedure - a definitive chest drain will be required to stabilise the ongoing air leak.
Indications
Clinical evidence of a tension pneumothorax:
- hypoxia
- hypotension
- tachycardia
- decreased air entry +/- hyper-resonance on side of pneumothorax
- deviated trachea to opposite side
- increased difficulty in ventilation
- radiographic evidence of a tension pneumothorax in a haemodynamically stable patient.
Equipment
- 14 gauge or 16 gauge cannula
- 3-way tap
- 10mL syringe
- Appropriate skin antiseptic:
- Infants, children, adolescents: 2% chlorhexidine & 70% isopropyl alcohol (e.g., Maxi swab stick) or
- Povidone iodine if known sensitivity to chlorhexidine
- Neonates ≥ 28 weeks gestation: 1% chlorhexidine & 70% isopropyl alcohol (swab stick preferable).
Procedure
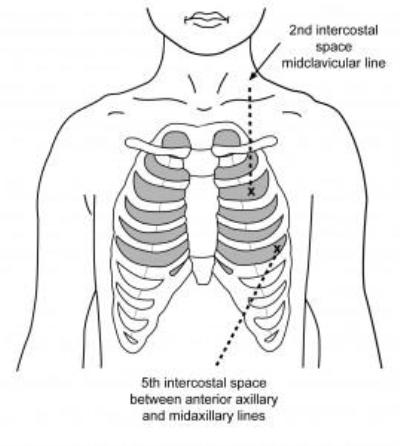
- Identify the second intercostal space, mid clavicular line of affected hemi thorax
- Cleanse the skin
- Consider local anaesthetic in the conscious child (if time permits)
- Attach 10mL syringe to the end of the cannula
- Insert the cannula into the lower half of the second intercostal space, at 90º to the chest wall
- Aspirate the syringe as the needle enters
- Continue advancing the cannula until you aspirate air (3-4ml of 0.9% saline in the syringe may help with presence of air bubbles) or until you insert to the maximum depth
- At either of these end points remove the syringe and needle, leaving the cannula uncapped in the chest wall
- Check for improvement of the child's clinical condition
- A 3-way tap may be applied for ongoing aspiration, if required
- Consider a second needle decompression if there is no apparent improvement
- 1cm adjacent to the original cannula
- Proceed to chest drain insertion as soon as possible when patient is stabilised
- Perform the chest X-ray (CXR) after the formal chest drain has been placed.
Intercostal Catheter Insertion1,2
An intercostal catheter provides drainage of pleural air, blood or fluid.
Indications
- Following a needle decompression of tension pneumothorax
- Large pneumothoraces (> 20%)
- Most traumatic haemothoraces
- Large pleural effusions.
Equipment
- Appropriate skin antiseptic
- Sterile surgical drapes, gown, mask
- Sterile gloves
- Local anaesthetic, syringe and needle
- Gauze
- Scalpel blade
- Forceps for blunt dissection
- Chest drain - without trochar
- Suture - 2.0 silk
- Sterile transparent occlusive dressing
- Atrium drainage system (Underwater seal drainage system)
- 2 x large chest drain clamps per chest drain.
Chest tube size
Size: approximately (in Fr) 4 x ETT size (in mm)
| Newborn |
8-12 |
| Infant |
14-20 |
| Child |
20-28 |
| Adolescent |
28-36 |
*Advanced Paediatric Life Support (APLS): The Practical Approach to Emergencies. 6th Edition 2017
Procedure
- Explain the procedure to the parent (and child if appropriate).
- Position patient:
- Supine or sitting 30º upright
- Arm on affected side positioned above the shoulder behind the head
- Complete and record a full set of observations on the Observation and Response Tool and record additional information on the Clinical Comments chart.
- Monitor oxygen saturations throughout the procedure.
- Consider the need for adjunctive analgesia or sedation
- within limits of patient safety as determined by the clinical scenario
- e.g. intranasal fentanyl or intravenous morphine
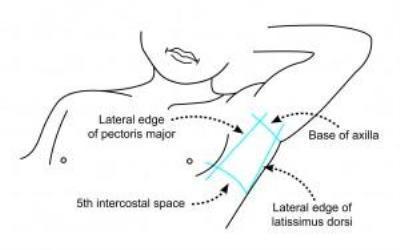
- Identify insertion site
- Typically 5th intercostal space anterior to mid-axillary line
- Aseptic technique used throughout procedure. Refer to Aseptic Technique – Infection Prevention and Control Manual (internal WA Health only)
- Prepare skin with appropriate antiseptic
- Drape area
- Infiltrate local anaesthetic
- Superficially under the skin
- Advance needle fully until air aspirated from pleural cavity
- Slowly withdraw and infiltrate from deep to superficial
- Perform skin incision in the identified rib space parallel to rib (above the lower rib to avoid neurovascular bundle)
- Length: approximately twice the width of the drain
- Depth: until subcutaneous fat is on view
- Blunt dissect through remainder of the chest wall using blunt dissection forceps
- Continue until the pleural space is penetrated (evidenced by a 'give' or air hiss)
- Remove instruments and insert finger through the tract into the pleural space
- Perform a single sweep with finger internally within the pleural space
- This is only possible in older children
- Insert chest drain, without trochar, into pleural space
- Use forceps to guide the drain, if necessary
- Aim for apex if draining air and base if draining fluid
- Insertion depth is approximately the width of the hemithorax - ensure all holes in chest drain are within pleural space
- Connect chest drain to underwater seal drain
- Check for fogging of the tube, bubbling of underwater seal and swing of blood, fluid
- Suture drain in place
- Place an occlusive dressing over the area
- Confirm position with CXR - where multiple drains are inserted, label each drain to identify where the catheter tip is located
- Secure connection of chest drainage system with cable ties.
This open technique for chest drain insertion should be used for all trauma patients.
A Seldinger technique using commercial intercostal drain kits may be used for spontaneous pneumothoraces or pleural effusions after discussion with senior clinicians.
Patient assessment and monitoring
- Continuous pulse oximetry – until otherwise advised by treating medical team
- Complete a full set of observations and record on the Observation and Response Tool, record additional observations on the Clinical Comments chart.
- Record all vital signs on the Observation and Response chart:
- Respiratory distress and rate, oxygen saturations, oxygen therapy, heart rate, capillary refill, blood pressure, pain, consciousness and temperature
- ½ hourly for first 2 hours following insertion, then
- 1 hourly for 4 hours, then
- 4 hourly as clinically indicated / directed by medical team
- Assess chest movements, depth of breathing and air entry with auscultation,
and record on the clinical comments sheet.
- Commence an UWSD Chest Drain Management Record (MR934.01). Suction pressure settings and additional medical orders should be documented on the front of the form by the treating medical team and at any time changes are made.
- Assess drainage colour, consistency and volume
- Assess drain patency – drainage, swinging, bubbling
- Assess the insertion site, dressing and drain securement and position
- Assess and manage pain.
Escalating care
Escalate immediately if any of the following signs and symptoms redevelop or worsen and there are other signs of respiratory compromise:
- Increased respiratory rate
- Shallow breaths
- Cyanosis, falling oxygen saturations, increasing oxygen requirements
- Asymmetrical chest movement (may be present for a while after insertion)
- Decreased air entry on auscultation (may be present for a while after insertion)
- Hypotension
- Tachycardia / bradycardia
- Subcutaneous emphysema (may be present for a while after insertion)
- Sudden increase or decrease in drainage or a blocked drain is suspected.
Patient transfer
When transferring patient between clinical areas a nurse escort and all necessary emergency equipment is to accompany the patient.
- If connected to suction, disconnect suction and leave open to air.
- Do not clamp the tube, unless ordered by the medical team.
- Ensure drain is never lifted above chest level
- Two guarded artery forceps per chest drain
- Sterile gauze, steristrips and transparent dressing in case of accidental dislodgement
- Stethoscope
- Oxygen and suction unit for airway management
- Portable patient monitor.
References
- Advanced Life Support Group (ALSG), Advanced Paediatric Life Support: A Practical Approach to Emergencies 6th edition, Wiley Blackwell; 2016
- Huggins J, Carr SR, Woodward G. Thoracostomy tubes and catheters: Placement techniques and complications. 2021 UpTo Date:
| Endorsed by: |
Nurse, Co-director, Surgical Services |
Date: |
Jun 2022 |
This document can be made available in alternative formats on request for a person with a disability.